Are You A Business?
Are You A Business?

Halloween is just around the corner, and if you’re looking for a fun and easy way to put together your perfect Halloween party spread, look no further than these amazing cake pops. They’re made with a delicious cake, then covered in chocolate and decorated with all sorts of fun candies and sprinkles. The best part? They’re incredibly easy to make!
You can put together a batch of these in no time at all. These are great for parties or just for snacking during those long days when you have nothing better to do than watch Netflix all day (you know what we mean). So go ahead and order yourself up some cake pops today—you won’t regret it!

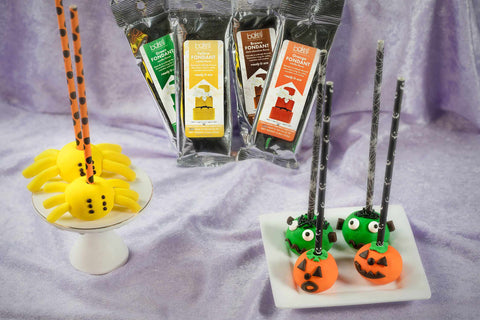
Halloween is one of those holidays where we feel like you can be extra creative when it comes to making desserts and fun themed treats. One of our favorite ways to get creative is with cake pops! You can take those cute little balls of sweet, moist, decadent cake and turn them into virtually anything! This season we decided to create some with fondant accents to make them spooky and silly.
We recommend making your cake pops one to two days before your party. However, if you're adding fondant to them, make the fondant pieces a couple of days before so they have adequate time to dry. Once you have assembled your cake pops, they can be stored in an airtight container, or wrapped in plastic wrap.
They do not need to be refrigerated after making them, unless you're making them with a perishable filling of some sort. Fondant does not hold up well in the refrigerator, so we recommend not refrigerating them. The fondant will hold too much moisture and will then sweat when taken out, causing your decorations to fall off. That is not something you want to happen!
These would be delicious with chocolate cake, vanilla, even strawberry! You can even use food coloring for your cake or frosting to spice things up a bit.
The day before you want to make them, bake your cakes so they have enough time to fully cool down before crumbling. We recommend using a standard box cake mix recipe of your choice. Once cakes are cooled completely, crumble them until there are no large chunks or pieces of cake left. You want everything crumbled completely.
Once crumbled, you will want to add about 3/4 of a container of your favorite frosting of choice. We like putting gloves on for this part, so if you have some take them out.
Take the frosting and add it to the crumbled cake, using your hands to mix it all together until the frosting is fully incorporated into the cake. You want it to be "wet" enough that you can roll into balls approximately 1 1/2" without them falling apart, but not so wet that they're sticky and hard to handle.
After molding each cake pop ball, place on a parchment paper lined baking sheet and let them rest for about 15-20min. Cover them with plastic wrap and place in the refrigerator for 10-15 more minutes until nice and cold, this will make dipping them much easier! As they are chilling, prepare your decorating station. Place sprinkles in small bowls for easy access, have your fondant pieces ready to attach with melted chocolate, and any chocolate you want for drizzling already added to a piping bag.
Once chilled, take them out and begin assembling! You'll want to take your cake pop straws and dip them in the melted chocolate about a 1/2 inch, and then insert into the top of the ball. Since the cake pops we are making will be "upside down", you won't run the risk of the stick pushing through.
After inserting the straws, you'll want to begin dipping the pops. Taking your time, submerge the ball into the melted chocolate in one full motion. Make sure to get the chocolate up to where the cake and straw meet, it'll help secure the cake to the stick.
Pulling the cake pop straight up, allow the excess chocolate to drip off back into the bowl, tapping softly on your hand. Set aside on the parchment paper you used earlier. If you're adding sprinkles or anything, add them while the chocolate is still melty, so they stick appropriately.
Repeat with remaining cake balls.
Store them on the counter to set, cover with plastic wrap or in a sealed container until ready to serve!

You absolutely can! They're a great treat to make ahead of time and freeze well in an airtight container or freezer zip top bag for up to 6 weeks! Just pop them out of the freezer and let them sit in the fridge overnight before decorating them.
There is no need to feel intimidated when making cake pops, they're incredibly easy to make. You can choose any flavor combination you want, let your taste buds and imagination lead you.
The best part about making these chocolate covered treats? Not only are they CUTE, but they're equally delicious, and fun to eat! They're the perfect thing to bring to your next office party, Halloween get together, or birthday party.